
Documentation
iOS USB edition install
On this page
- 1. When to use
- 2. What gets installed
- 3. PC-side install
- Step 1: Select products
- Step 2: Select components
- Step 3: Install folder
- Step 4: Download
- Step 5: Install
- Step 6: Run control center
- Buy and bind a USB device license (required)
- Step 7: Run iEasyRun
- Step 8: Workstation home
- 4. Phone / environment setup
- Install AiSi / iTools (recommended)
- Install IPA (required)
- USB and trust
- App authorization (required)
- Workflow node “Start automation environment”
- 5. Acceptance
- Troubleshooting
- Related
TL;DR
Downloader: iOS USB + AI workstation → install control center + workstation → IPA on phone → USB so control center sees the device. ~10 minutes.
1. When to use
- USB cable iPhone automation on Windows
- EasyClick iOS USB control center required; iEasyRun adds AI chat / workflows / MCP
- Stable USB sessions, screen mirroring
2. What gets installed
| Component | Role |
|---|---|
| EasyClick iOS USB control center & mirroring | Recognize USB iPhone |
| iOS developer image archive | Control center dependency |
| iEasyRun AI workstation | Chat, workflows, MCP |
| Phone IPA | Enable automation on iPhone |
3. PC-side install
Before you install — turn off protection (important)
Before install and first launch, disable antivirus, Windows Security (real-time protection, etc.), and temporarily turn off the firewall, so the downloader, control center, or iEasyRun are not blocked, quarantined, or prevented from starting. After everything runs normally, you can turn protection back on as needed.
Downloader: https://ieasyclick.com/downloader
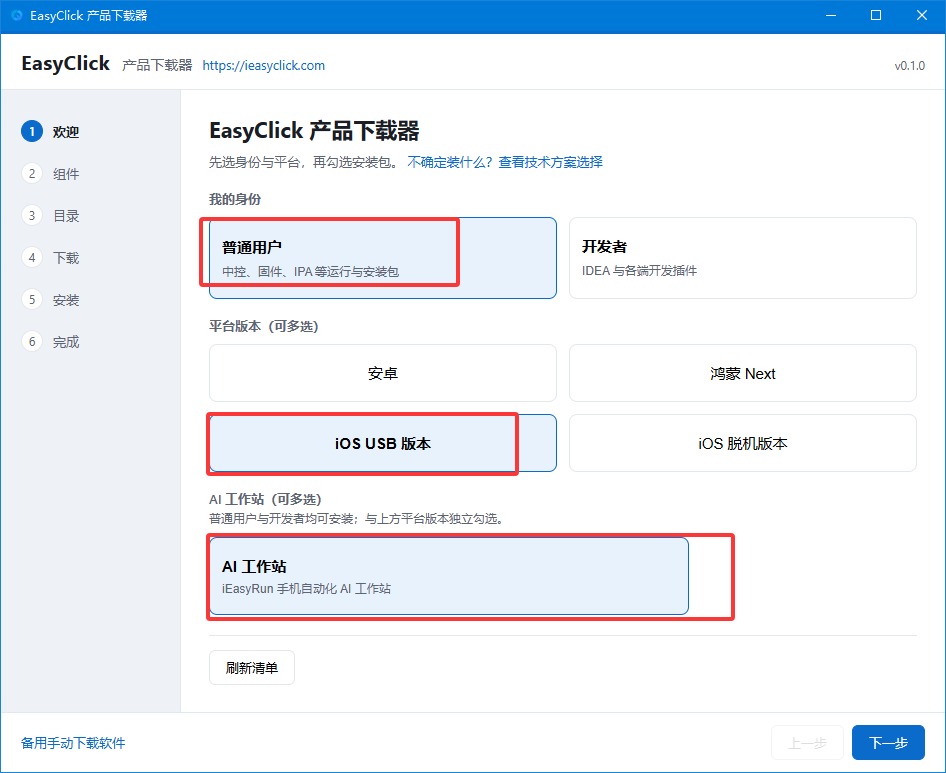
Step 1: Select products
On the welcome page, check:
- Platform: iOS USB
- AI workstation: AI workstation
Click Next.
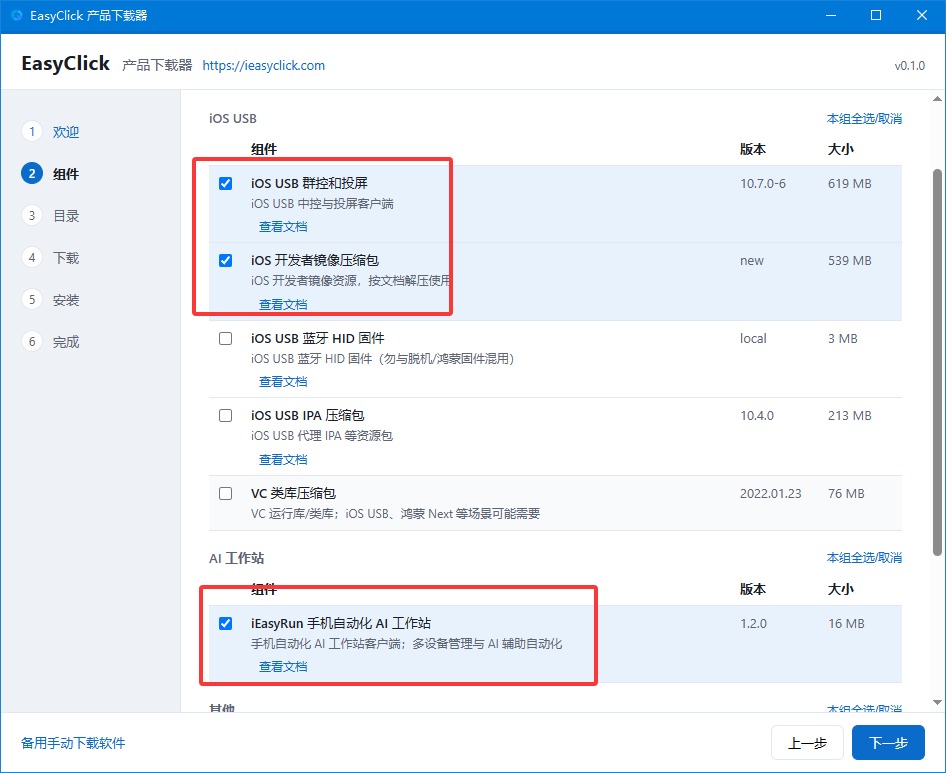
Step 2: Select components
Check:
- iOS USB control center & mirroring
- iOS developer image archive
- iEasyRun AI workstation
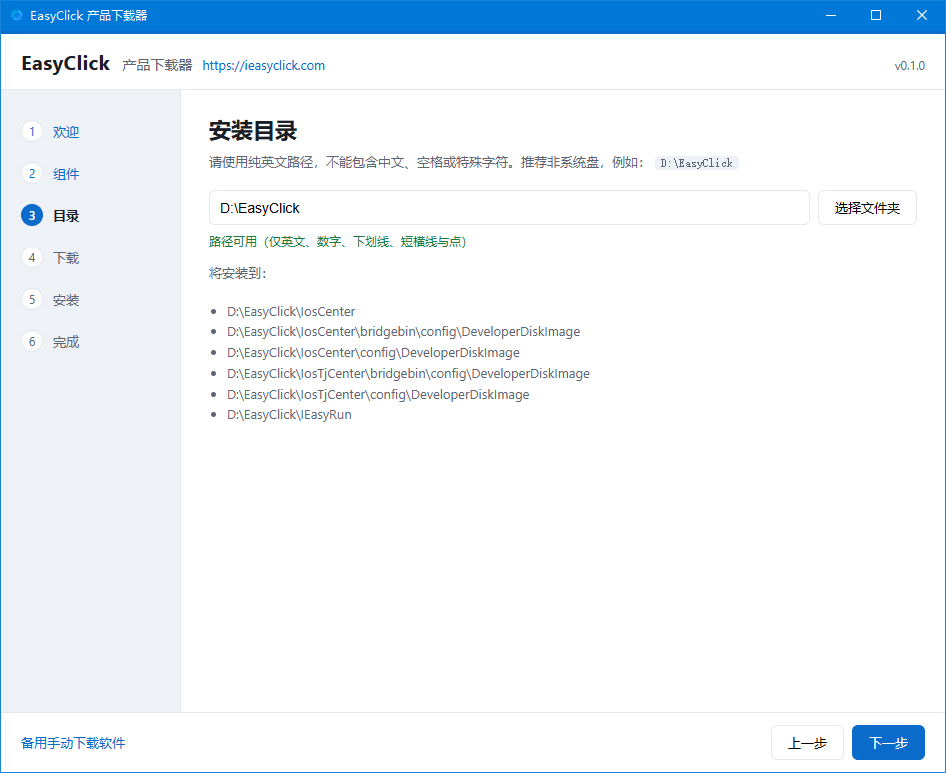
Step 3: Install folder
Default path is fine.
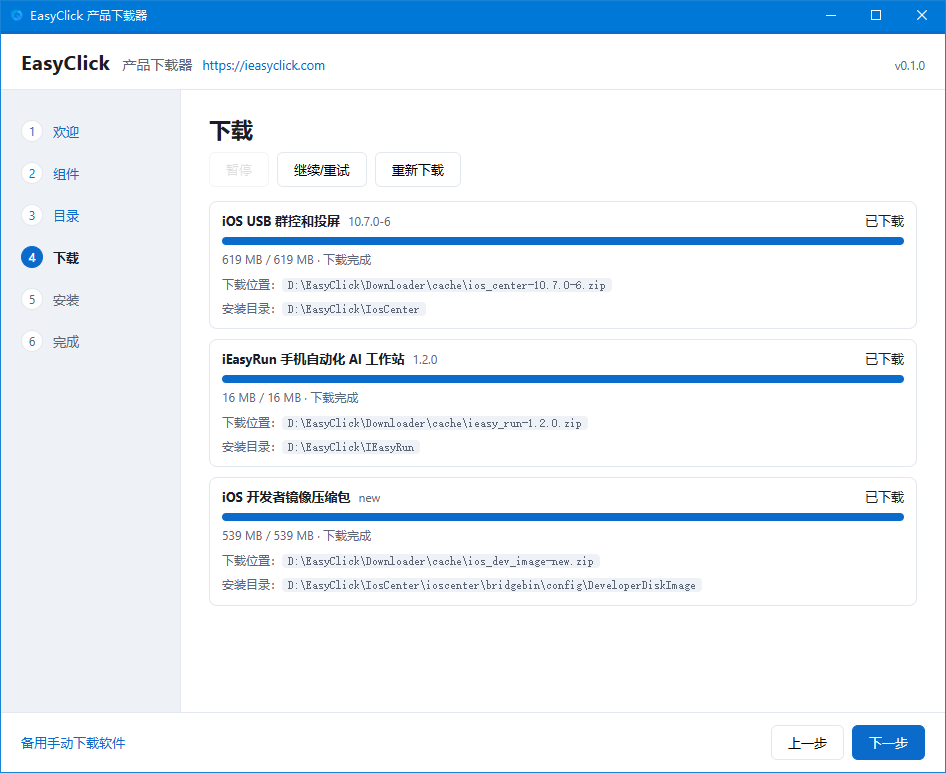
Step 4: Download
Wait for batch download to finish.
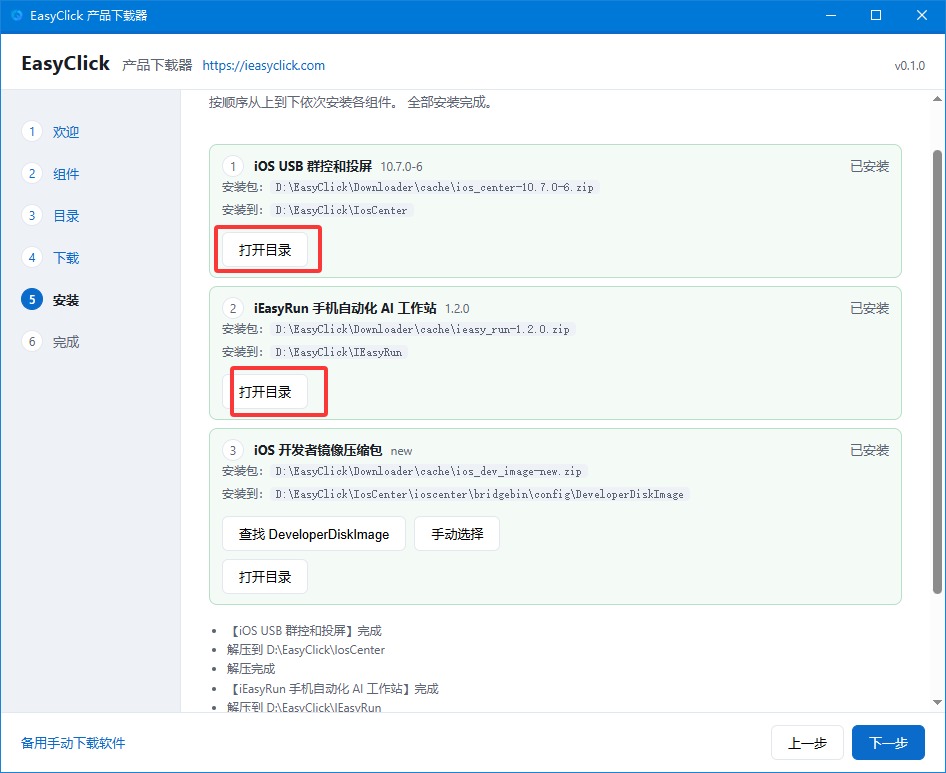
Step 5: Install
Follow prompts; use Open folder to locate files.
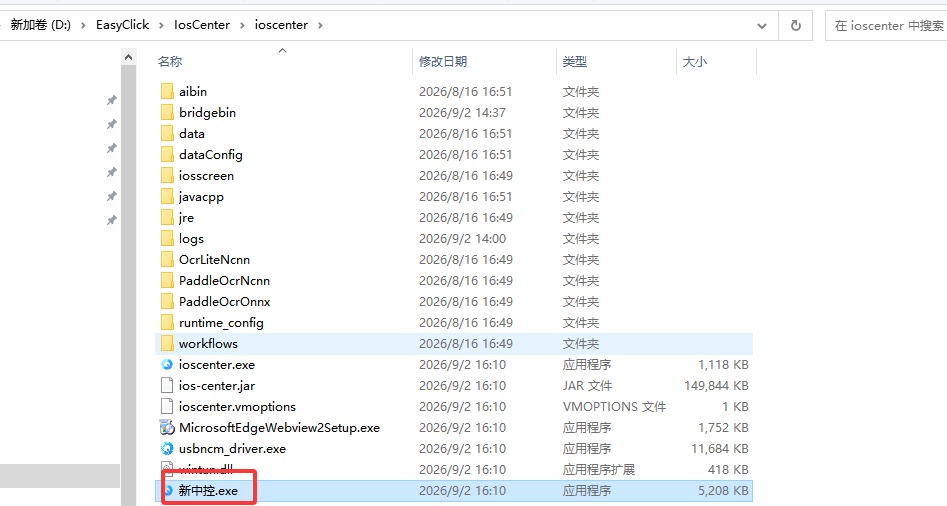
Step 6: Run control center
Double-click 新中控.exe (control center exe). Register or sign in with EasyClick.
Reminder
After registration, sign in on both sides — the control center and iEasyRun. Missing either login will block later steps.
Buy and bind a USB device license (required)
Before use, purchase a license, then bind it in the iOS USB control center:
- Buy a license from your reseller or official channel
- Open License center in the control center
- When binding, set License type to USB device license (USB 设备授权)
Without a bound USB device license, the device may not work for automation.
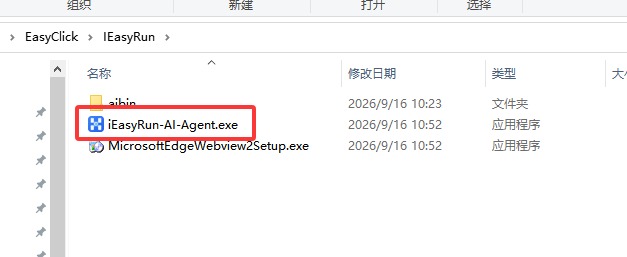
Step 7: Run iEasyRun
Double-click iEasyRun-AI-Agent.exe. If it fails, run MicrosoftEdgeWebview2Setup.exe first. After launch, sign in with the same account (if you just registered in the control center, sign in here as well).
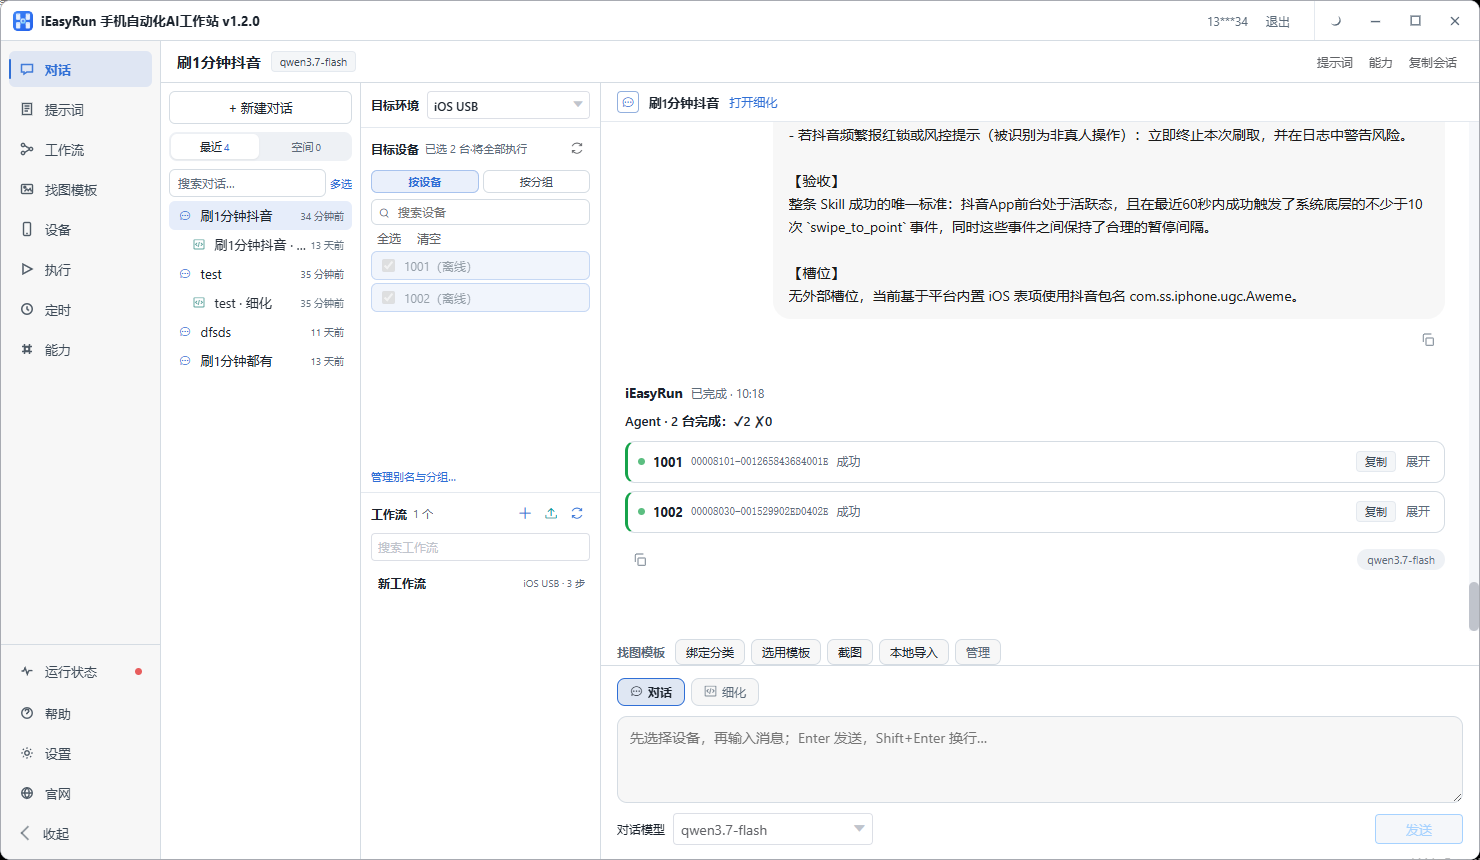
Step 8: Workstation home
You should see the iEasyRun home UI.
4. Phone / environment setup
Install AiSi / iTools (recommended)
Before installing the IPA, install AiSi Assistant (爱思助手) on Windows (download):
- Connect iPhone via USB and tap Trust this computer
- Open AiSi and confirm it shows your connected iPhone
Reminder: At minimum, AiSi must see the phone connected. If AiSi cannot detect the device, check the cable, USB port, and trust prompt, then try AiSi’s Repair driver feature before installing the IPA or using the control center.
Install IPA (required)
- Download IPA: https://ieasyclick.com/ec-tj-mainapp
- Install via AiSi / iTools to the phone (after AiSi recognizes the device)
- Used as offline main app or USB automation service (iOS 15+ recommended)
USB and trust
- Connect iPhone with USB
- Tap Trust this computer
- Keep control center running; device visible in control center UI
App authorization (required)
On iOS 15+, use the offline main app IPA as the USB automation service. Complete the items below on the phone—keep-alive and Photos matter for stability and media workflows (IME is optional, see below).
Based on EasyClick IME docs, photo library docs, and offline control-center guide.
Keep-alive
- Open main app → App settings → Keep-alive: check all three → Save
- Confirm floating window appears so the app stays active in background
Input method (optional, as needed)
The main app includes a custom keyboard. You do not need it for every task—chat and workflows can use taps, paste, OCR, etc. Configure IME only when you need keyboard-based text entry (IME workflow steps, long text typing):
- Settings → General → Keyboard → Keyboards → Add New Keyboard → enable the keyboard named after your main app (default may be “易点云测”; restart iPhone if missing)
- Tap that keyboard → turn on Allow Full Access
- Focus an input field; if the yellow-background main-app keyboard does not appear, tap the globe key to switch
Limitation
Password fields and apps that block third-party keyboards fall back to the system keyboard—automation cannot type there.
Photo library (required for album import / video workflows)
- Allow the Photos prompt on first use (prefer “All Photos” / full access)
- If denied: Settings → [main app] → Photos and enable access
- App settings → Permission grants (v7.x+) can batch-request album and other permissions
Album wipe operations are irreversible—confirm device and scope before running workflows.
Other system permissions
- Location, Background App Refresh, Local Network as prompted
Self-check
| Capability | How to verify |
|---|---|
| IME (optional) | When typing is needed, yellow main-app keyboard appears |
| Photos | Photos permission on in Settings |
| Keep-alive | All three keep-alive options + floating window |
| Automation | Main app shows running / Automating Running state |
Workflow node “Start automation environment”
Some workflows start with this node—it depends on USB session and IPA. If it fails, recheck this section.
5. Acceptance
- EasyClick iOS USB control center running
- iEasyRun workstation running
- USB device license bound in control center License center
- IPA installed on iPhone
- App authorization done (keep-alive, Photos, etc.; IME optional)
- Device online on Devices after USB connect
Then: Getting started → first Chat task.
Troubleshooting
| Symptom | Fix |
|---|---|
| Workstation won’t start | Install WebView2 setup exe |
| AiSi cannot see phone | Try another cable/USB port, replug, confirm Trust this computer; use AiSi’s Repair driver feature; reinstall AiSi if needed. Install IPA only after AiSi recognizes the device |
| Control center no phone | Cable, replug USB, trust PC, signed in; first confirm USB works in AiSi |
| No license / automation blocked | Bind a license in control center License center, type USB device license; buy from reseller/official if needed |
| Stuck on “Start automation environment” | IPA + USB + both apps running |
| IME typing fails when needed | IME added, Full Access on, yellow keyboard active |
| Album import fails | Photos permission; App settings → Permission grants |
| Automation stops mid-run | Keep-alive (all three) + floating window |
| offline in workstation | Confirm online in control center first |